HowTo test cmserver
From ComputeMode
(Difference between revisions)
| Line 1: | Line 1: | ||
[[Category:User doc]] |
[[Category:User doc]] |
||
[[Category:Status Draft]] |
[[Category:Status Draft]] |
||
| − | [[Category:Version 1.0.2]] |
+ | [[Category:Version 1.0.3]] |
| Line 10: | Line 10: | ||
* Actions to perform: |
* Actions to perform: |
||
| − | Be sure that the CMserver is running and available |
+ | ** Be sure that the CMserver is running and available |
| − | Be sure that nodes are configured to boot from LAN |
+ | ** Be sure that nodes are configured to boot from LAN |
| − | Launch several nodes at same time |
+ | ** Launch several nodes at same time |
* Checks to perform: |
* Checks to perform: |
||
| − | Check that into the CMwebadmin interface, nodes are recorded with the "unconfigured" tag |
+ | ** Check that into the CMwebadmin interface, nodes are recorded with the "unconfigured" tag |
| − | Check that after IPXE discovery the operating system on the disk is booting |
+ | ** Check that after IPXE discovery the operating system on the disk is booting |
| − | Check the /var/log/apache2/error.log file to detect some web errors |
+ | ** Check the /var/log/apache2/error.log file to detect some web errors |
| − | Check the /var/log/error.log file to detect some DHCP/IPXE/TFTP errors |
+ | ** Check the /var/log/error.log file to detect some DHCP/IPXE/TFTP errors |
| Line 27: | Line 27: | ||
* Actions to perform: |
* Actions to perform: |
||
| − | Log-in into the CMwebadmin interface and configure node scheduler by editing node settings. You can choose the "Always CM" scheduler. By default, this scheduler is using the Debian Squeeze operating system. |
+ | ** Log-in into the CMwebadmin interface and configure node scheduler by editing node settings. You can choose the "Always CM" scheduler. By default, this scheduler is using the Debian Squeeze operating system. |
| − | Launch several nodes at same time |
+ | ** Launch several nodes at same time |
* Checks to be perform: |
* Checks to be perform: |
||
| − | Check that the CM image is correctly booting |
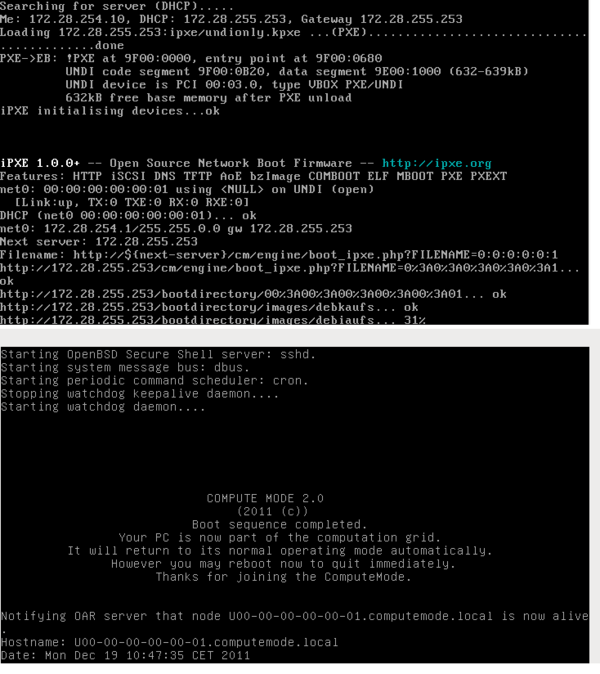
+ | ** Check that the CM image is correctly booting |
[[Image:CMtest_boot2.png|center|600px|thumbnail|CM boot image]] |
[[Image:CMtest_boot2.png|center|600px|thumbnail|CM boot image]] |
||
| − | Check that nodes are also creating into the OAR database (you can use Monika to check that CPU/CORE feature is available) |
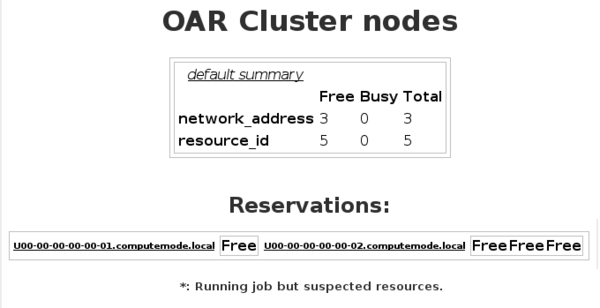
+ | ** Check that nodes are also creating into the OAR database (you can use Monika to check that CPU/CORE feature is available) |
[[Image:CMtest_boot3.png|center|600px|thumbnail|OAR node creation with CPU/CORE feature]] |
[[Image:CMtest_boot3.png|center|600px|thumbnail|OAR node creation with CPU/CORE feature]] |
||
| Line 44: | Line 44: | ||
* Actions to perform: |
* Actions to perform: |
||
| − | Create nodes to boot in compute mode (see http://computemode.imag.fr/mediawiki/index.php/ComputeMode_server_appliances for more details) |
+ | ** Create nodes to boot in compute mode (see http://computemode.imag.fr/mediawiki/index.php/ComputeMode_server_appliances for more details) |
| − | Launch several nodes in Compute Mode. During the first boot in computemode a node will be created in the OAR database. |
+ | ** Launch several nodes in Compute Mode. During the first boot in computemode a node will be created in the OAR database. |
| − | Execute a POV ray demo from the main menu (the link should look likes to http://yourcmserver/wrapper.php?key=raytracing) |
+ | ** Execute a POV ray demo from the main menu (the link should look likes to http://yourcmserver/wrapper.php?key=raytracing) |
* Checks to perform: |
* Checks to perform: |
||
| − | Check that the demo is running correctly and the image appears |
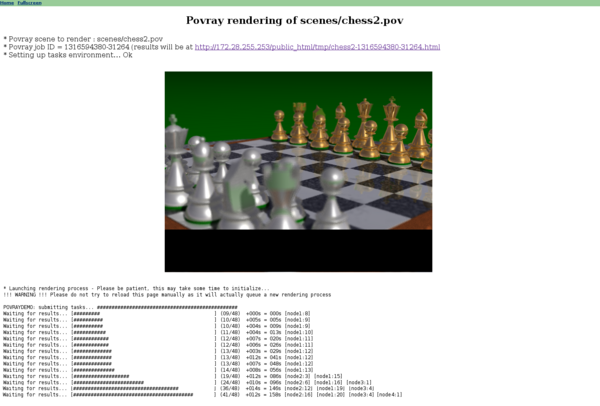
+ | ** Check that the demo is running correctly and the image appears |
| − | Check that several nodes are used to compute the image |
+ | ** Check that several nodes are used to compute the image |
[[Image:CM_demos.png|center|600px|thumbnail|CM POV Ray demos]] |
[[Image:CM_demos.png|center|600px|thumbnail|CM POV Ray demos]] |
||
| − | Check OAR nodes status with Monika |
+ | ** Check OAR nodes status with Monika |
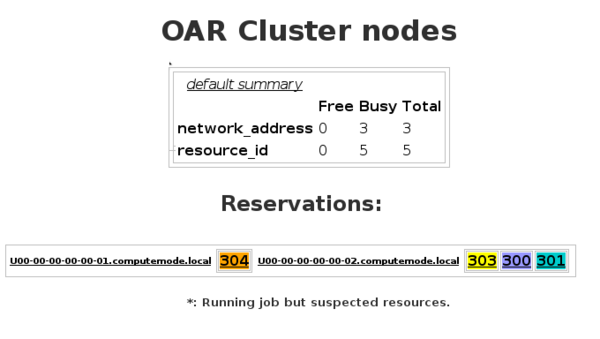
[[Image:CMtest_boot4.png|center|600px|thumbnail|OAR node status during running jobs]] |
[[Image:CMtest_boot4.png|center|600px|thumbnail|OAR node status during running jobs]] |
||
| Line 62: | Line 62: | ||
* Actions to perform: |
* Actions to perform: |
||
| − | Fill informations in the /var/www/cm/config.php file about LDAP server connection: $GLOBALS['LDAPSERVER'] refers to the IP address of the LDAP server. Change if you want some variables: $GLOBALS['LDAPPORT'] refers to the port to establish a connection with the server, $GLOBALS['IDENT_LDAPPASSWORD'] refers to the password in the computemode database that identify LDAP users... |
+ | ** Fill informations in the /var/www/cm/config.php file about LDAP server connection: $GLOBALS['LDAPSERVER'] refers to the IP address of the LDAP server. Change if you want some variables: $GLOBALS['LDAPPORT'] refers to the port to establish a connection with the server, $GLOBALS['IDENT_LDAPPASSWORD'] refers to the password in the computemode database that identify LDAP users... |
| − | Just log-in in the cmwebadmin interface with LDAP credential |
+ | ** Just log-in in the cmwebadmin interface with LDAP credential |
* Checks to perform: |
* Checks to perform: |
||
| − | When you are logged-in with LDAP credentials, a local account should be created in the cmwebadmin database. You can see it with the administrator account in the 'accounts' menu |
+ | ** When you are logged-in with LDAP credentials, a local account should be created in the cmwebadmin database. You can see it with the administrator account in the 'accounts' menu |
Latest revision as of 14:00, 1 February 2012
[edit] Node autodetection, boot of the CM image and OAR node's creation
For node atodetection:
- Actions to perform:
- Be sure that the CMserver is running and available
- Be sure that nodes are configured to boot from LAN
- Launch several nodes at same time
- Checks to perform:
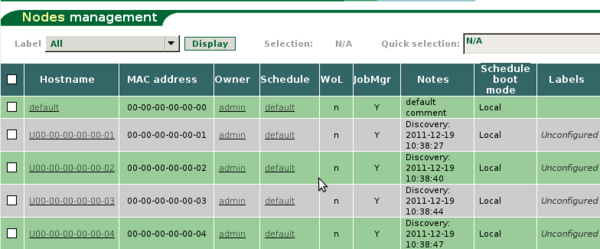
- Check that into the CMwebadmin interface, nodes are recorded with the "unconfigured" tag
- Check that after IPXE discovery the operating system on the disk is booting
- Check the /var/log/apache2/error.log file to detect some web errors
- Check the /var/log/error.log file to detect some DHCP/IPXE/TFTP errors
For the CM boot image and OAR node creation:
- Actions to perform:
- Log-in into the CMwebadmin interface and configure node scheduler by editing node settings. You can choose the "Always CM" scheduler. By default, this scheduler is using the Debian Squeeze operating system.
- Launch several nodes at same time
- Checks to be perform:
- Check that the CM image is correctly booting
- Check that nodes are also creating into the OAR database (you can use Monika to check that CPU/CORE feature is available)
[edit] OAR access and POV ray demos
To check OAR access you can use the POV ray demos from the main menu of the CMWebadmin interface:
- Actions to perform:
- Create nodes to boot in compute mode (see http://computemode.imag.fr/mediawiki/index.php/ComputeMode_server_appliances for more details)
- Launch several nodes in Compute Mode. During the first boot in computemode a node will be created in the OAR database.
- Execute a POV ray demo from the main menu (the link should look likes to http://yourcmserver/wrapper.php?key=raytracing)
- Checks to perform:
- Check that the demo is running correctly and the image appears
- Check that several nodes are used to compute the image
- Check OAR nodes status with Monika
[edit] LDAP account access
- Actions to perform:
- Fill informations in the /var/www/cm/config.php file about LDAP server connection: $GLOBALS['LDAPSERVER'] refers to the IP address of the LDAP server. Change if you want some variables: $GLOBALS['LDAPPORT'] refers to the port to establish a connection with the server, $GLOBALS['IDENT_LDAPPASSWORD'] refers to the password in the computemode database that identify LDAP users...
- Just log-in in the cmwebadmin interface with LDAP credential
- Checks to perform:
- When you are logged-in with LDAP credentials, a local account should be created in the cmwebadmin database. You can see it with the administrator account in the 'accounts' menu
